Learn, how to use the image intervention composer package for image resizing in the laravel 11 application. I will show Laravel 11 Image Intervention Tutorial. You Can Learn How to Save JSON Data in Database in Laravel 11

Intervention Image is an open-source PHP image manipulation library. It provides an easier way to manipulate images. You can use the Intervention/Image library for PHP projects as well. You can do the following things with images using the Intervention Image Composer package. I will give only the most commonly used functions here.
- crop()
- blur()
- canvas()
- filter()
- fill()
- height()
- insert()
- width()
- make()
- reset()
- resize()
- save()
- text()
- rotate()
You should have the following two extensions enabled on your server.
- GD
- Imagick
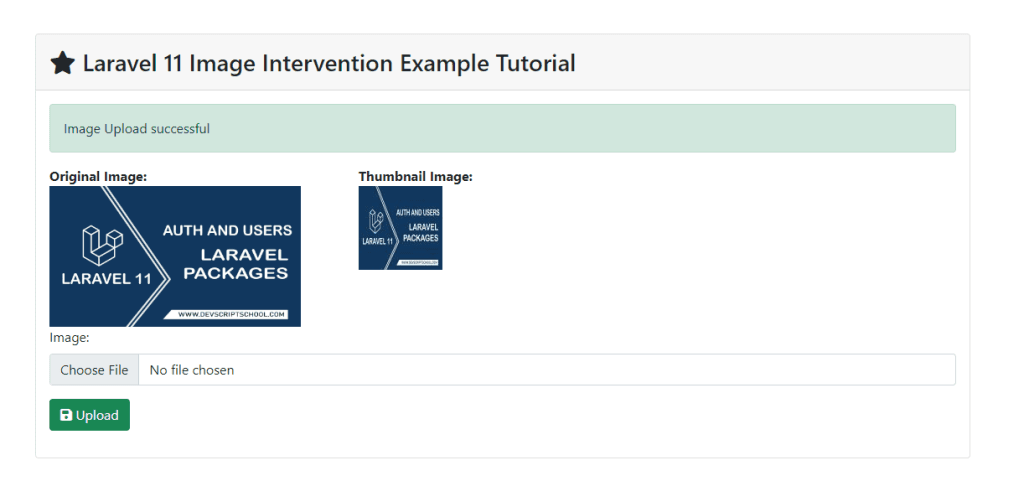
In this example, we will install the Intervention/Image Composer package. Intervention/Image provides the `resize()` method to resize images. We will create a simple form with an input field. You can choose an image, and then you will see a preview of the original and thumbnail images.
So, let’s follow the below steps to generate a thumbnail image in the Laravel application.
So, let’s follow the below steps to generate a thumbnail image in the Laravel 11 application.
Step 1: Install Laravel 11
This step is not required; however, if you have not created the Laravel app, then you may go ahead and execute the below command:
composer create-project laravel/laravel Image-InterventionStep 2: Install Intervention Image Package
In the second step, we will install intervention/image-laravel for resizing images. This package allows us to generate thumbnail images for our project. So, first, fire the command below in your CMD or terminal:
composer require intervention/imageStep 3: Create Routes
In this step, we will add routes and a controller file. So first, add the below route in your routes.php file.
routes/web.php
<?php

use Illuminate\Support\Facades\Route;

use App\Http\Controllers\ImageController;

Route::get('image-upload', [ImageController::class, 'index']);
Route::post('image-upload', [ImageController::class, 'store'])->name('image.store');
Step 4: Create Controller File
Now, it is required to create a new ImageController for image upload and resizing. So, first, run the command below:
php artisan make:controller ImageControllerAfter this command, you can find the ImageController.php file in your app/Http/Controllers directory. Open ImageController.php file and put below code in that file.
Make sure you have created “images” and “thumbnail” (inside the images folder) folder in the public folder.
app/Http/Controllers/ImageController.php
<?php

namespace App\Http\Controllers;

use Illuminate\Http\RedirectResponse;
use Illuminate\Http\Request;
use Illuminate\View\View;
use Intervention\Image\Drivers\Gd\Driver;
use Intervention\Image\ImageManager;

class ImageController extends Controller
{
    /**
     * Display a listing of the resource.
     *
     * @return \Illuminate\Http\Response
     */
    public function index(): View
    {
        return view('imageUpload');
    }

    /**
     * Display a listing of the resource.
     *
     * @return \Illuminate\Http\Response
     */
    public function store(Request $request): RedirectResponse
    {
        $validated = $request->validate([
            'image' => 'required|image|mimes:jpeg,png,jpg,gif,svg|max:2048',
        ]);

        $manager = new ImageManager(new Driver());

        $image = $manager->read($request->file('image'));

        // Main Image Upload on Folder Code
        $imageName = time().'-'.$request->file('image')->getClientOriginalName();
        $destinationPath = public_path('images/');
        $image->save($destinationPath.$imageName);

        // Generate Thumbnail Image Upload on Folder Code
        $destinationPathThumbnail = public_path('images/thumbnail/');
        $image->resize(100,100);
        $image->save($destinationPathThumbnail.$imageName);

        /**
         * Write Code for Image Upload Here,
         *
         * $upload = new Images();
         * $upload->file = $imageName;
         * $upload->save();
         */

        return back()
            ->with('success','Image Upload successful')
            ->with('imageName',$imageName);
    }
}
Step 5: View File and Create Upload directory
Okay, in this last step, we will create the imageUpload.blade.php file for the photo upload form and manage error messages and also success messages. So first, create the imageUpload.blade.php file and put the code below:
resources/views/imageUpload.blade.php
<!DOCTYPE html>
<html>
<head>
    <title>Laravel 11 Image Intervention Example Tutorial - ItSolutionStuff.com</title>
    <link href="https://cdn.jsdelivr.net/npm/[email protected]/dist/css/bootstrap.min.css" rel="stylesheet" crossorigin="anonymous">
    <link rel="stylesheet" href="https://cdnjs.cloudflare.com/ajax/libs/font-awesome/6.5.1/css/all.min.css" />
</head>

<body>
<div class="container">

    <div class="card mt-5">
        <h3 class="card-header p-3"><i class="fa fa-star"></i> Laravel 11 Image Intervention Example Tutorial</h3>
        <div class="card-body">

            @if (count($errors) > 0)
                <div class="alert alert-danger">
                    <strong>Whoops!</strong> There were some problems with your input.<br><br>
                    <ul>
                        @foreach ($errors->all() as $error)
                            <li>{{ $error }}</li>
                        @endforeach
                    </ul>
                </div>
            @endif

            @session('success')
                <div class="alert alert-success" role="alert">
                    {{ $value }}
                </div>

                <div class="row">
                    <div class="col-md-4">
                        <strong>Original Image:</strong>
                        <br/>
                        <img src="/images/{{ Session::get('imageName') }}" width="300px" />
                    </div>
                    <div class="col-md-4">
                        <strong>Thumbnail Image:</strong>
                        <br/>
                        <img src="/images/thumbnail/{{ Session::get('imageName') }}" />
                    </div>
                </div>
            @endsession

            <form action="{{ route('image.store') }}" method="POST" enctype="multipart/form-data">
                @csrf

                <div class="mb-3">
                    <label class="form-label" for="inputImage">Image:</label>
                    <input
                        type="file"
                        name="image"
                        id="inputImage"
                        class="form-control @error('image') is-invalid @enderror">

                    @error('image')
                        <span class="text-danger">{{ $message }}</span>
                    @enderror
                </div>

                <div class="mb-3">
                    <button type="submit" class="btn btn-success"><i class="fa fa-save"></i> Upload</button>
                </div>

            </form>
        </div>
    </div>
</div>
</body>

</html>
Run Laravel App:
All the required steps have been done, now you have to type the given below command and hit enter to run the Laravel app:
php artisan serveNow, Go to your web browser, type the given URL and view the app output:
http://localhost:8000/image-uploadOutput:


If some one wishes expert vjew about running a blog then i prropose him/her to visit this weblog, Keep
up the fastidious work. https://WWW.Waste-NDC.Pro/community/profile/tressa79906983/
Hello there! This post couldn’t be written any better! Reading this post reminds me
of my old room mate! He always kept chatting about this.
I will forward this write-up to him. Pretty sure he
will have a good read. Thanks for sharing! https://www.uniladtech.com/news/tech-news/man-spent-10000-bitcoin-two-pizzas-worth-144371-20241205
It’s very trouble-free to find out any topic on web as compared to textbooks, as I
found this article at this website. https://wakelet.com/wake/ounW0BgxMPtgwSjJSePQk
May I just say what a relief to discover someone that truly
understands what they’re discussing over the internet.
You actually realize how to bring an issue to light and make it
important. More and more people must read this and understand this
side of your story. I was surprised that you’re not more popular since you surely
possess the gift. https://einweg-endoskope.blogspot.com/2025/02/urologische-einweg-endoskope-wiscope.html
Wow, this article is nice, my sister is analyzing these things, therefore
I am going to convey her. https://vidico.com/news/blockchain-animation/
Howdy! This is kind of off topic but I need some
help from an established blog. Is it difficult to
set up your own blog? I’m not very techincal but I can figure things out
pretty fast. I’m thinking about creating my own but I’m not sure where to begin. Do you have any
ideas or suggestions? With thanks https://menbehealth.wordpress.com/